Use Qiskit Code Assistant in JupyterLab
Learn how to install, use, configure, and uninstall the official Qiskit Code Assistant extension in JupyterLab.
- This documentation is relevant to IBM Quantum® Platform Classic. If you need the newer version, go to the new IBM Quantum Platform documentation.
- This is an experimental feature available only to IBM Quantum® Premium Plan users.
- Qiskit Code Assistant is in preview release status and is subject to change.
- If you have feedback or want to contact the developer team, use the Qiskit Slack Workspace channel or the related public GitHub repositories.
Install the JupyterLab extension
To install the JupyterLab extension, run the following command from a terminal:
pip install qiskit-code-assistant-jupyterlabAfter installing the extension, start JupyterLab:
jupyter labThe extension loads automatically and is listed on the bottom of the JupyterLab window. Refer to the JupyterLab documentation for help working with JupyterLab.
Configure extension settings
It is recommended that you edit the following JupyterLab settings by going to Settings -> Settings Editor:
-
Click Inline Completer, find "Show widget" and choose Always. This means that the inline completer widget will always be shown so you can cycle through and select a completion item.
-
Click Code Completion and increase the value for "Default timeout for a provider." to
10000or 10 seconds. The default value is 1 second, but the Qiskit Code Assistant API might take longer than this to find a suggestion. This setting only applies to the standard context menu that is invoked withTab. The inline completer has a default of 10 seconds.
Other settings you might want to change:
-
Keyboard shortcuts can be changed from Settings > Settings Editor > Keyboard Shortcuts.
-
You can change the IBM Quantum Classic API token to use in the JupyterLab command palette. To do that, type
Alt+Shift+C, search forqiskit, select the Qiskit Code Assistant: Set IBM Quantum API token command, and paste in your key. -
[Advanced] To change the instance of the Qiskit Code Assistant service that the extension should use, edit Qiskit Code Assistant
serviceUrlsetting. -
[Advanced] Keyboard shortcuts can be changed by searching for
completerin the Keyboard Shortcuts settings (Settings -> Settings Editor -> Keyboard Shortcuts) and adding new shortcuts for the relevant commands.
Get started using the Qiskit Code Assistant extension for JupyterLab
Authentication and setup
After installing the extension, it tries to authenticate you. By default, the package tries to authenticate to IBM Quantum services with the defined Qiskit API key, and uses your token from the QISKIT_IBM_TOKEN environment variable or from the file ~/.qiskit/qiskit-ibm.json (under the section default-ibm-quantum). If you need help configuring your account, follow the instructions in Set up to use IBM Quantum Platform.
By default, the extension uses the granite-3.3-8b-qiskit model, which is listed in the Model Picker in the bottom status bar.
The first time you use the granite-3.3-8b-qiskit model, a window opens that lists some major restrictions that you should be aware of when using the model. Click Accept to enable the model for code generation.
Generate code
While you develop your code using Qiskit, you can ask to Qiskit Code Assistant to help you. In general, the assistant suggests better code as response to Python comments or docstrings, but you can use the assistant anywhere in your file.
To get a code suggestion, type a prompt, then type Alt + . or Alt + \. There are two types of prompts you can use:
- Enter partial code and get a suggestion to finish the code. Example:
from qiskit.circuit import QuantumCircuit from qiskit.transpiler import generate_preset_pass_manager from qiskit_ibm_runtime import SamplerV2 as Sampler from qiskit_ibm_runtime.fake_provider import FakeManilaV2 # Bell Circuit qc = QuantumCircuit(2) qc.h(0) qc.cx(0, 1) qc.mea # Type Ctrl + . for a code suggestion. - Type a pound (#) sign, then type your prompt. Example:
# Give me a random circuit of 5 qubits and a depth of 4.
Work with code suggestions
Use the following to accept, reject, and cycle through suggestions:
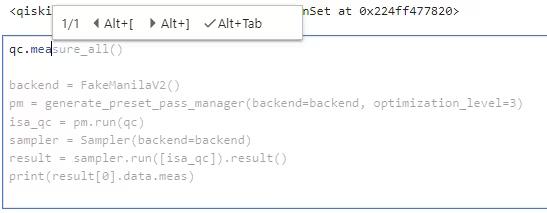
Alt+[andAlt+]can be used to cycle through the list of suggestions (if there are more than one).Alt+TaborAlt+ENDaccepts the suggested code and inserts it at the current cursor location.
Additionally, after the assistant runs, you can use the buttons on the widget to cycle or accept the suggestion:

The service can sometimes take a few seconds to return a suggestion, you can see when the service is working by checking the status bar.
Jupyterlab also includes a traditional suggestion context menu. Use the Tab key to run and display the context menu.
The context menu includes suggestions from JupyterLab in addition to suggestions made by Qiskit Code Assistant. The context menu also sanitizes and trims the suggestions, making it less useful for reviewing the code suggestion before inserting it.
Uninstall the JupyterLab extension
To remove the Qiskit Code Assistant extension from JupyterLab, run:
pip uninstall qiskit_code_assistant_jupyterlabTroubleshooting
If you see the frontend extension but it is not working, check that the server extension is enabled:
jupyter server extension listIf the server extension is installed and enabled, but you don't see the frontend extension, check that the frontend extension is installed:
jupyter labextension listContribute to the JupyterLab extension
The code for this extension is publicly available and open source. Check it out in GitHub.
Next steps
See examples to use Qiskit Code Assistant for circuits, configuring error suppression, and transpiling with pass managers.